The video motion sensor reacts to movements in certain image areas called video motion windows (VM windows in short). You can define one or more independent video motion windows for each image sensor (camera lens).
The camera also provides two different groups of video motion windows that can be set independently from one another: VM and VM2. This provides a means for detecting direction of motion, for example (see the Event Logic help page).
If Video Motion Style has been set to On and highlight on event, for example, the camera will display every VM window as a dotted frame.
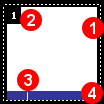
| 1 |
Frame:
|
| 2 |
VM window ID: |
| 3 |
Minimum area trigger: |
| 4 |
Status bar:
|
Frame: If the camera detects movements in an active VM window that exceed the percentage set in the minimum area parameter (see Video Motion Window Definitions below), the complete frame of the window turns red.
VM window ID: If Show Video Motion Window ID has been enabled (this is the default), every window shows an identification number in its top left corner. This number corresponds to the line number within the definition box, i.e. window #1 is the first defined VM window. Comments and empty lines do not increase the VM window ID.
Status bar: Shows the current activity (detected movement in the image) of every window and has one or two small markers showing the current trigger limits (see Video Motion Window Definitions below). If the VM window is not active (too dark or initializing), camera will hide the status bar for this time.
Every line in the definition box not beginning with a dollar ($generate=, auto-generated VM windows) or hash sign (#, comments) defines one VM window. This is an example for a VM window definition line with all optional parameters and their default values:
0,270,190,100,100,a=25,am=90,s=15
Syntax:
[!/$generate=/#]image sensor, horizontal position, vertical position, width, height, [, a=<min. area>] [, am=<max. area>] [, s=<sensitivity>]
(optional parameters have brackets)
! |
Defines a reference window (see below). |
|---|---|
$generate= |
Defines a set of auto-generated windows (see below). |
# |
Introduces a comment line (see below). |
| Image Sensor | 0 = right camera lens 1 = left camera lens |
| Horizontal position | Position of the left VM window border from the left edge of the visible image in pixels. |
| Vertical position | Position of the top VM window border from the upper edge of the visible image in pixels. |
| Width | Width of the VM window in pixels. |
| Height | Height of the VM window in pixels. |
| Minimum area | Values: 0-99 (lower: more sensitive) This parameter controls the percentage of the VM window area that needs to change from one frame to the next in order to trigger an event. Decreasing this value will make the VM window more sensitive. This value can be left out; in this case, the camera will use the default value of 25. |
| Maximum area | Values: 0-99 The maximum percentage of the window area that is allowed to change from one frame to the next in order to trigger an event. You can use this value to suppress false alarms resulting from global changes (e.g. when the lights are turned on). This is an optional parameter, which will not be used, if it has not been specified explicitly. |
| Sensitivity | Values: 0-99 (higher: less sensitive) This parameter controls the percentage of detected change in the pixels in a VM window, which must be reached to trigger an event. Besides the detection area, this is the second parameter to tune the detection performance. The sensitivity value can normally be left out (thus using the default setting), but may be helpful in difficult situations. By default, this value is 20 for regular VM windows and 10 for reference windows. |
| Note: | If you would like to define a new or additional window, open the Event Settings dialog and follow the instructions in the Graphically Entering Image Areas help page. |
|---|
Reference windows are used to avoid false alarms for events that would be triggered by VM windows, e.g. if lighting conditions change rapidly (sun and cloudy sky, headlights from cars, etc.).
To define a reference window, simply create an additional VM window in a portion of the image where no movements are expected. Then add an exclamation mark (!) in front of the VM window definition.
Example: !0,912,750,364,188,a=25
Note that specifying a maximum area for reference windows is possible, but not very useful.
If a reference window triggers, all VM windows will be disabled for the time specified for the Video Motion Suppression Time parameter. If this value is 0, the camera only suppresses video motion windows that have triggered in the same image as the reference window.
In order to temporarily deactivate VM windows, place a hash sign (#) in front of the definition. This VM window definition will still be saved, but will not be used as a video motion window. In addition, comments generally help keep an overview if the VM window definitions are complex.
This special mode allows generating several video motion windows with only one line, allowing you to create a "minefield" of VM windows with only one definition line. It can also be used to quickly find an optimum set of parameters for a given lighting situation. This is an example for a auto-generated VM window definition line with all optional parameters:
$generate=0,100,100,20,20,25,25,70,70
Syntax:
$generate=image sensor, width, height, horizontal gap, vertical gap, min. area left, min. area right, max. area bottom, max. area top
None of the parameters are mandatory (the most simple definition is $generate=); if no values are specified, the camera will use the defaults.
| Image Sensor | 0 = right camera lens 1 = left camera lens Default: 0 |
|---|---|
| Width | Width of the VM window in pixels. Default: 100 |
| Height | Height of the VM window in pixels. Default: 100 |
| Horizontal gap | Horizontal distance between one window and the next in pixels. Default: 20 |
| Vertical gap | Vertical distance between one window and the next in pixels. Default: 20 |
| Minimum area | If two different values are specified, the minimum area parameter for the generated windows varies between the first value for the leftmost column of windows and the second value for the rightmost column. The values for the windows in-between are interpolated linearly. If the same value is specified for both parameters, all windows use this value. Default: 25 |
| Maximum area | Varies the maximum area parameter in the same fashion as for minimum area, but in vertical direction from bottom to top. If no values are specified, the maximum area is disabled. Default: Off |
Generated windows have their own ID numbering system for every $generate definition line, indicated by a leading "g". Note that several $generate= definition lines can be used, but the VM window IDs will not be unique any more.
Make sure that you only use the maximum area parameter if absolutely necessary. It can help when trying to determine a good value for this kind of "minefield" set of VM window definitions.
$noiseadjust=0..1. Controls the sensitivity to image noise.1 (default): Activates image noise filtering. Differences in the brightness if those image pixels that are below the calculated noise value, will not trigger a video motion window.0: Deactivates image noise filtering. Motion detection is more sensitivity in dark scenes, but the number of false alarms due to image noise may increase.$postfilter=0..1. Controls how changes in illumination are treated.1 (default): Activates "post-filtering" of the VM window(s). Uniform changes in illumination are filtered and will not trigger the VM window.0: Deactivates post-filtering and thus increases VM sensitivity. Note that switching post-filtering off is only recommended when illumination does not change. In this case, you can use this setting to increase the sensitivity of the VM windows.$limit=0..100. Defines a percentage for pixel brightness from which video motion detection will be more sensitive.$limit=60 would limit VM detection to all pixels that have at least 60% brightness.If this option is activated, all video motion definitions will be used on both image sensors. This option is only available on Day/Night models.
Activating this option will detect video motion on both image sensors (regardless of which sensor is actually shown on the Live screen). Note that using this option may reduce the maximum frame rate. A video motion window explicitly defined for the left image sensor will remain active, even if you only see the image of the camera's right image sensor. This means that the camera will react on events detected on the left (invisible) image sensor. This option is only available on Dual models.
Disables motion detection if illumination drops below the selected value. This value can be set independently for each camera lens.
Click on the Set button to activate your settings and to save them until the next reboot of the camera.
Click on the Close button to close the dialog. While closing the dialog, the system checks the entire configuration for changes. If changes are detected, you will be asked if you would like to store the entire configuration permanently.
| cn, en |